
We've taken the time to do a step by step photo tutorial of how to assemble the boxes just in case anyone is struggling putting theirs together. Depending on how many boxes you have purchased you will receive a number of items.

A) A Brown outer box
B) A White inner box with an Oval Window
C) An Acetate Sheet with a white backing.
You will also need some sellotape or some glue for assembling your box, We preferred sellotape as it doesn't make the cardboard soggy.

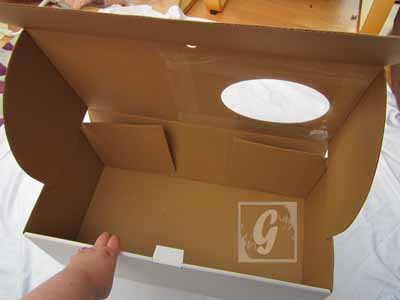
The first step is to open out your White Inner Box, lay it white side down.

Then take your Acetate Sheet and peel off the white backing. You don't need the paper backing so you can discard it.

Lay your Acetate Sheet over the oval hole in your box and using sellotape fix it to the box.

The prefolded lines in the box will make folding very easy, lift the left side of your box inwards.

Fold in the top small lip as shown in the photo.

Repeat folding in of the lower lip on the left side of the box.

Do the same for the right hand side of the box.
You can put some sticky spots on the lips on the white side to help keep the lips in place as it can be an awkward operation holding it all in place.

Lift up the non window flap.

Fold the white non window flap inside the box completely. The two notches at the bottom should slip into the slits at the bottom of the box and hold the Flap in place, but you can also use a sticky spot or rolled up sellotape to hold it in place.

Turn the half finished box around so that the completed side is now facing you and the window flap is pointing away.

As with the lower part of the box, fold the side lips inwards.

Lift the Window flap up against the lips, again if you struggle to keep the pieces in place you can always use a couple of stick spots or folded selotape to hold the flaps together.
Slip the curved sides of the upper window flap inside your box and you are pretty much done assembling your box.

Your box is ready now to decorate!


0 comments:
Post a Comment